Rubber to Metal Bonding
Designing a custom rubber part that requires bonding to a metal component can be very challenging. It's important that the following items are well understood and designed:
1. Determining the Rubber Material
2. Determining the Substrate
3. Determining the Bond Type
A. Encapsulation
B. Chemical Bonding with Adhesive
C. Gluing after Vulcanization
4. Adhesion Testing
1. Determining the Rubber Type
Custom Rubber Corp. works with just about every rubber or thermoset material currently on the market. The table below outlines some common characteristics for the most-used materials. The table is a rough guide - contact Custom Rubber Corp. for expert assistance with selecting the appropriate material for the application in question.
| MATERIAL |
ABBREVIATION |
VIBRATION
ISOLATION |
RELATIVE PRICE |
TEMPERATURE RANGE |
OZONE, UV RESISTANCE |
OIL RESISTANCE |
| Natural |
NR |
Excellent |
Good |
-60F to 220F |
Poor |
Poor |
| Butyl |
IIR |
Excellent |
Fair |
-75F to 250F |
Good |
Poor |
| Ethylene-Propylene |
EPDM |
Good |
Excellent |
-70F to 250F |
Excellent |
Poor |
| Nitrile |
NBR |
Good |
Good |
-30F to 250F |
Poor |
Excellent |
| Neoprene / Chloroprene |
CR |
Excellent |
Excellent |
-60F to 220F |
Good |
Fair |
| Silicone |
VMQ |
Good |
Fair |
-175F to 450F |
Excellent |
Fair |
2. Determining the Substrate Material / Determine the Material for the Mating Part
Sometimes the substrate material is pre-determined, such as when a system is fully designed and an unexpected leak or rattle occurs that requires rubber to be bonded to an existing component. Sometimes there is some latitude during the design phase to consider a number of different substrates or materials for mating parts.
Custom Rubber Corp. is not an expert in materials like steel and plastic, but we can be helpful in understanding any challenges or restrictions that particular materials may present if used in bonding to rubber.
For example, rubber needs to be vulcanized at temperatures above 300 degrees Fahrenheit. This requires that any substrate chosen for chemical adhesion must be able to survive that temperature for an extended amount of time, which excludes a lot of plastic materials such as Polypropylene and Styrene. These low-melt plastics can be bonded to rubber after vulcanizing with special cyanoacrylate adhesives or can also be designed to mechanically “bond” or mate with a rubber component. (See the grommet design page for common geometry used to mechanically “bond” rubber to low-melt plastics).
Generally, if plastic is going to be used as the substrate, it must be a glass-filled nylon material with a higher melt temperature.
Another issue to consider when choosing a substrate is what will be required to prepare the substrate for molding. Many untreated metals are susceptible to rust which can inhibit bonding and contaminate rubber during the molding process. (See Step 3 below for more information on surface preparation required for bonding rubber to metal during vulcanization). On the flip side, some metal treatments are too smooth to allow for good chemical bonding and may need to be blasted or roughened prior to molding and bonding.
Finally, if the substrate is not going to be fully covered with rubber, thought must be given to how to protect the surface finish of the uncovered metal during the manufacturing process which includes heat and metal-to-metal contact when the insert is placed in the mold.
3. Determining the Bond Type
Once the rubber and metal type or substrate are defined, the type of bond or union has to be considered. Issues to consider when making this decision are cost, strength of bond required, direction of force or impact relative to the location of the bond, and substrate material. Below is a discussion of the pros and cons of the three types of rubber to metal bonding or rubber to substrate unions.
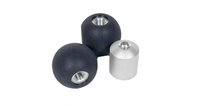
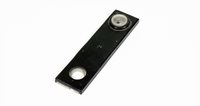
3.A. Encapsulation or Mechanical Lock
Oftentimes the most elegant and cost effective solution is encapsulation or a designed mechanical lock. Encapsulating metal with rubber requires that the metal/substrate have either a through-hole or some sort of positive feature that the rubber can mold around like a knob or neck. This technique is also used for many rubberized bolt heads. Below are some pictures showing different mechanical locks that Custom Rubber Corp. has developed in conjunction with customers.
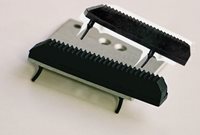

For this to be successful, the substrate has to be able to handle the molding temperatures, which can limit the choices of plastic and possibly limit some metal coatings as discussed above in Section 2.
Custom Rubber Corp.'s engineering and sales team have years of experience and have worked with countless customers developing innovative ways to ensure rubber and metal parts stay connected without the added cost of adhesive. Depending on the size of the part, eliminating the need for chemical adhesive can save 20% or more of the total cost. Additionally, when no adhesive is used, the metal inserts can easily be reclaimed, and remolded which reduces the costs associated with scrap and bad pieces.
3.B. Chemical Bonding with Adhesive
When the bond between rubber and metal is absolutely critical and involves complex geometry or is a very large or very small area, chemical bonding is likely the only choice. One advantage of this type of bond is that it extends over the entire surface of contact between the rubber and metal. When done correctly, this type of bond also exceeds the tear strength of the rubber, meaning that the rubber will tear before the bond fails; chunks of rubber will remain adhered to the metal if the two are separated.
This process involves four primary steps, outlined below.
i. Prepare the Metal Surface / Substrate Surface - The surface of the metal has to be somewhat rough and oil free to promote a good bond. For metal inserts, this is generally a tradeoff between rust inhibition and optimal surface for bonding to rubber.
- The most cost effective way to accomplish this is with a phosphate dip which removes all the machine oils from the metal and leaves an excellent bonding surface. The phosphate also provides some rust inhibition, but it's not the best.
- Some other plating or coating, such as hexavalent chromate, provide better rust inhibition than phosphate coating and good bonding surfaces but the temperature of the molding process tends to degrade the plating.
- If rust is not a concern, then a simple grit blast or tumble blast or a simple MEK wipe down will be adequate surface preparation.
ii. Apply a Primer - Most chemical adhesives require a primer coat that is designed to bond to the metal substrate and further enhance the surface for bonding the rubber.
iii. Apply the Adhesive - Like the primer, the adhesive can be applied in a number of different ways; dip and dry, spin coat, automated spraying, or manual spraying. If the majority of the metal or substrate is going to be covered with rubber, then dipping or spinning can be a very cost effective solution. However, dip and/or spin application is not a good choice if there will be exposed parts of the metal that will be in direct contact with the mold because the adhesive will bond to the mold over time causing very rapid mold fouling that requires frequent production interruption. One other note, the automated spraying process generally requires expensive tooling and does not make economic sense with anything but very high volume pieces.
iv. Load the Inserts into the Tool and Mold - Depending on the size of the inserts and the quantity of parts required, loading the inserts into the mold can be done manually, with a semi-automated loader board, or it can be completely automated. Custom Rubber Corp. generally works with customers that have annual quantities for which manual or semi-automated loading makes sense.
The chemical adhesive works equally well for all three types of molding; compression, transfer, and injection molding. The choice between which molding process to use depends on the size of the part, the rubber cross-section, and whether or not the part will be molded in color.
One disadvantage of chemical adhesion is cost. There is the additional cost of the metal preparation and the adhesive application. If there is any scrap, the additional cost of either scrapping the metal insert or reclaiming the insert, which is a multistep process.
3.C. Gluing after Vulcanization or Using PSA (Pressure Sensitive Adhesive)
There are some instances when gluing rubber to metal or plastic as a secondary operation is the best option.
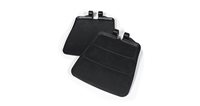
This is particularly true when the metal is a casting that is not precision machined. In the case of a rough casting, the dimensional tolerances are not tight enough for the inset to be placed into a mold and clamped under pressure - which is required when using the first two bonding techniques. Custom Rubber Corp. used this technique on a large footplate rest for a motorized wheelchair. Because the rubber was a topcoat designed to provide slip resistance, the end assembly was not exposed to harsh weather (i.e. not submerged in water or chemicals), and the primary force was compression (which pressed the rubber onto the casting), a secondary operation gluing the rubber to the metal was deemed to be the most cost effective.
This technique is also useful when the metal insert includes welded components. Oftentimes when the cost of precision welding is not workable, and the variation in amount of weld can lead to the same types of challenges described above - the metal insert may not consistently fit into the rubber mold. This can lead to either damage to the mold, or crushed, unusable metal inserts.
Another advantage to gluing rubber to metal, is the significant reduction of rework required. During the gluing process, any bad rubber components and any bad metal or plastic inserts can be sorted out prior to assembly resulting in zero scrap.
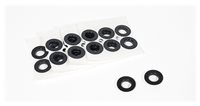
Custom Rubber Corp. has also used pressure sensitive adhesive (PSA), or double-sided tape to adhere rubber to metal, and in one particular case, rubber to glass. Often times, PSA is applied at our facility and the backing layer is left on the exposed side of the tape. When the customer receives the part, the backing layer is removed and the part is pressed into place. This was the case for one particular product Custom Rubber Corp. was involved in. After initially packaging the parts individually, Custom Rubber Corp. suggested packaging them in sets of six, which is how many were applied by the customer on each window. This ended up saving time in the customer's assembly process.
Whether using a glue or a pressure sensitive adhesive, the key is finding the right adhesive that will stick to the rubber material and the substrate. Custom Rubber Corp. has relationships with some of the best adhesive suppliers and some of the best adhesive tape suppliers in the country.
4. Adhesion Testing
In the most aggressive environments, the bond between rubber and metal, or rubber and plastic, should be stronger than the tear strength of the rubber. While there are defined ASTM standard tests for checking adhesion, these rely on bonding a thin strip of rubber to a thin strip of metal or plastic and then using test equipment to peel or pull the two materials apart. The advantage of these tests is that there is a specific, numeric result which is the force at which the bond fails. While these tests can be somewhat helpful for adhesive and material development, they do not generally help confirm good bond on finished product.
Custom Rubber Corp. has developed a number of different ways to test rubber to metal bonded parts. Sometimes these tests are destructive and can be done with a hydraulic press that applies or records pressure applied. Depending on the application and the direction of force vs. the direction of the bond, we can work with you to develop periodic testing that can reduce or eliminate the possibility of parts failing in application.
Conclusion
Custom Rubber Corp. has years of experience bonding rubber to metal. We have been involved in projects that use all types of rubber, all types of substrates (plastic and metal), and all types of bonding as described above. No matter what your application requires, Custom Rubber Corp. can help to demystify the sometimes complicated, “black magic” associated with rubber to metal bonding. Contact us today to talk about your project.
None of the parts pictured are in stock or for sale. These are all examples of custom-manufactured products that illustrate Custom Rubber Corp.'s capabilities.